Below you will find screenshots and descriptions of the WordSurv 6 user interface to help give you a feel for the layout changes and additions in WordSurv 6. Click on the thumbnail of a screenshot to open the full size version. (Please note that there may be some color distortion due to the compression of the image.) Some of these features have not yet been implemented, but we plan to have them implemented by the full release of WordSurv 6!
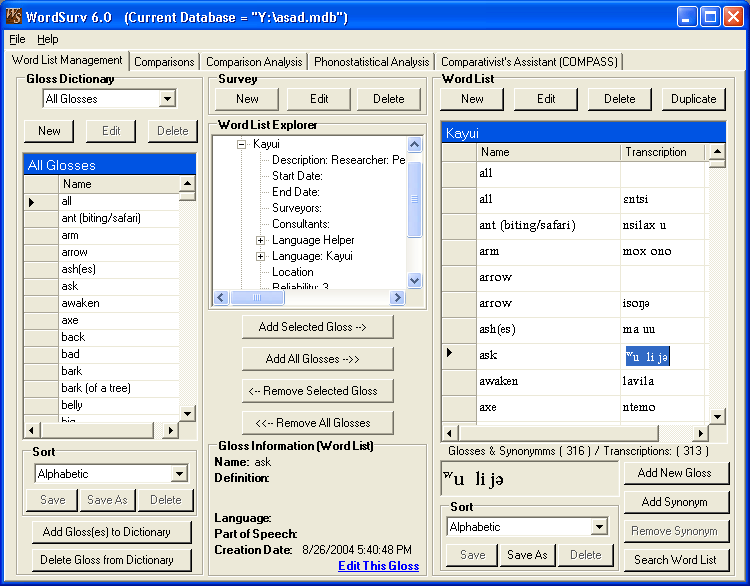
Fig. 1
The grid on the left hand side is the Gloss Dictionary grid. This is where all of the different glosses that are contained in the gloss dictionary are displayed. In the drop-down list box you will see that “All Glosses” are being displayed. You can change which Gloss Dictionary is displayed by changing this drop-down list box. Directly above the Gloss Dictionary Grid are the “New”, “Edit” and “Delete” buttons. These are the buttons you would use to create a new gloss dictionary, edit the selected gloss dictionary, and delete the selected gloss dictionary, respectively. Below the Gloss Dictionary grid is the sorting controls for the Gloss Dictionary. You can create your own sorting orders by rearranging the rows (Fig. 4) and then selecting the Save As button. You can also save your current sort by clicking the Save button located below the sort drop-down list box. In the lower left hand corner of the Word List Manager tab you will see two buttons, Add Gloss(es) to Dictionary and Delete Gloss from Dictionary. Add Gloss(es) will allow you to add a new gloss to the dictionary or existing glosses in the database that don’t currently belong to the gloss dictionary (see Fig 5). Delete Gloss from Dictionary will remove the selected gloss from the dictionary. If you have selected the “All Glosses” gloss dictionary, it will remove the gloss from the entire database permanently.
In the middle of the tab on the top you will see the Survey controls. You can create a new Survey, edit an existing survey that you have selected in the word list explorer, located directly below the survey controls, or you can delete the selected survey. The Word List Explorer groups the word lists based on the survey that they are a part of. To see the word lists in a certain survey click the ‘+’ icon next to the survey. To get more information about a certain word list click the ‘+’ icon next to the specific word list. When you click on the name of a word list or any attribute of that word list, the word list will load in the word list grid on the right hand side of the form and display the word list name atop the grid. Below the word list explorer are the controls to add all glosses or just the selected gloss to the word list or remove all glosses or just the selected gloss from the word list. When a gloss is selected in either the gloss dictionary grid or the word list grid, more information about that gloss will be displayed at the bottom in the Gloss Information section (along with the grid that the gloss is selected in).
At the top of the right hand side of the word list management tab you will see four buttons that deal with word lists. You can create a new word list (New button, See Fig 8), edit the currently displayed word list (Edit Button), delete the displayed word list (Delete button) or you can duplicate the word list (Duplicate button). Below the word list grid you will see the number of glosses and synonyms that the word list contains as well as how many of the glosses have transcriptions. The text box below the statistics displays the selected gloss’s transcription in a larger size font for easier readability. Below the text box are the sorting controls for the word list. If you wish to add a new gloss directly to the displayed word list then you can click the add new gloss button (See Fig 11). If you wish to add a synonym (another transcription for the same gloss) then select the Add synonym button. The remove synonym button will remove the selected synonym if applicable. You can also search (See Fig 12) or replace (See Fig 13) the transcriptions or the glosses for the word list by using the Search Word List button. To edit a transcription for a gloss, you simply double click the cell for the gloss in the transcription column. An example for this is provided in fig 29.
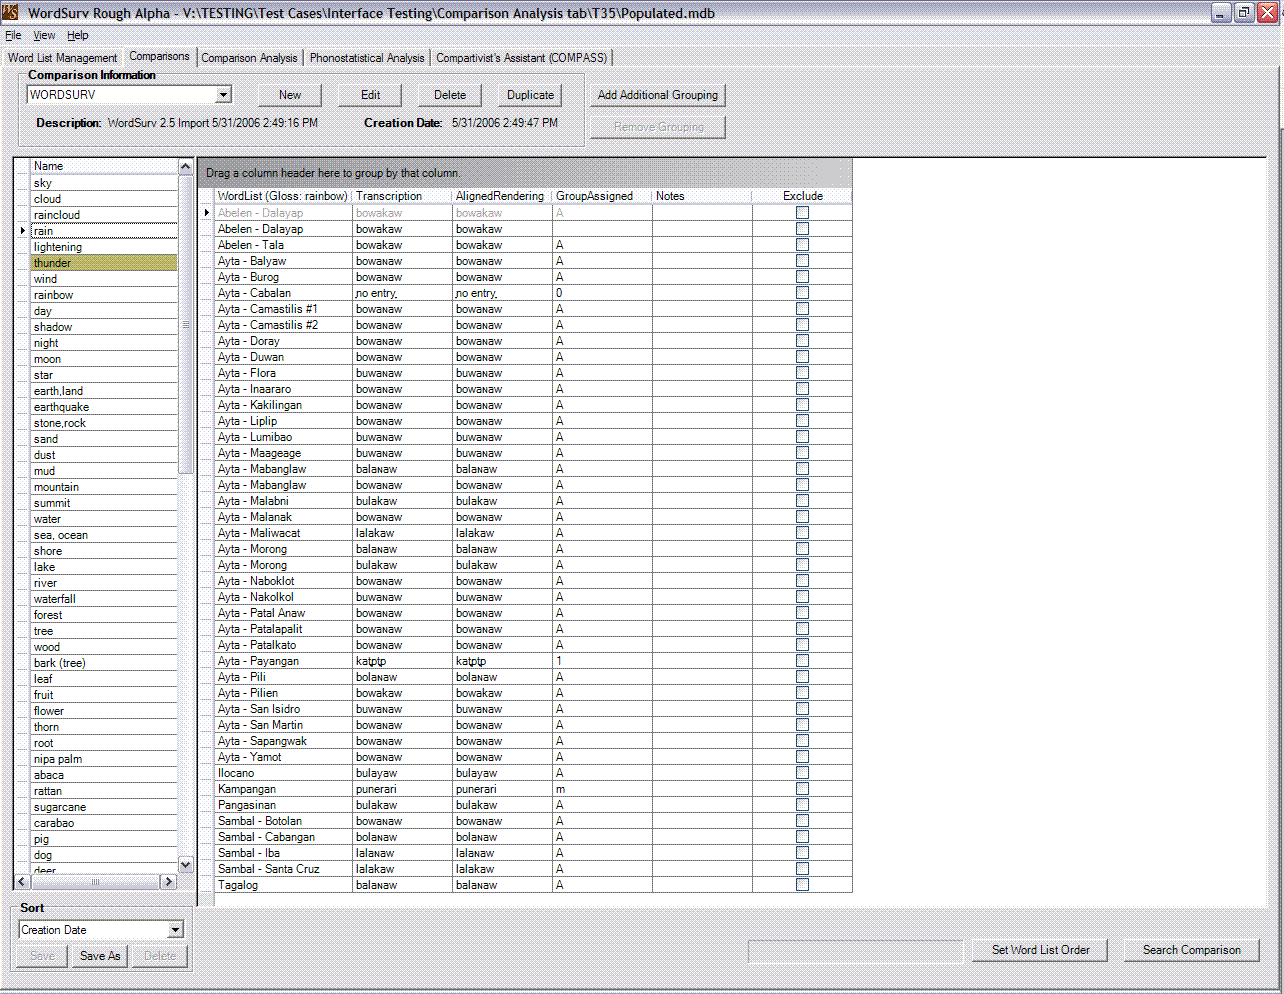
Fig. 4
When you click and hold on gloss and then drag the mouse above or below to another gloss, the other glosses will be highlighted yellow. When you release the mouse button, the gloss that you were "dragging" will be placed where the last highlighted gloss was positioned. When the gloss is repositioned, the other functions are locked to ensure you save your sort. If you don't want to save your sort, there is no need to worry. The cancel button (next to the "save", and "save as" buttons) will revert the current grid to the way it was before you sorted it!
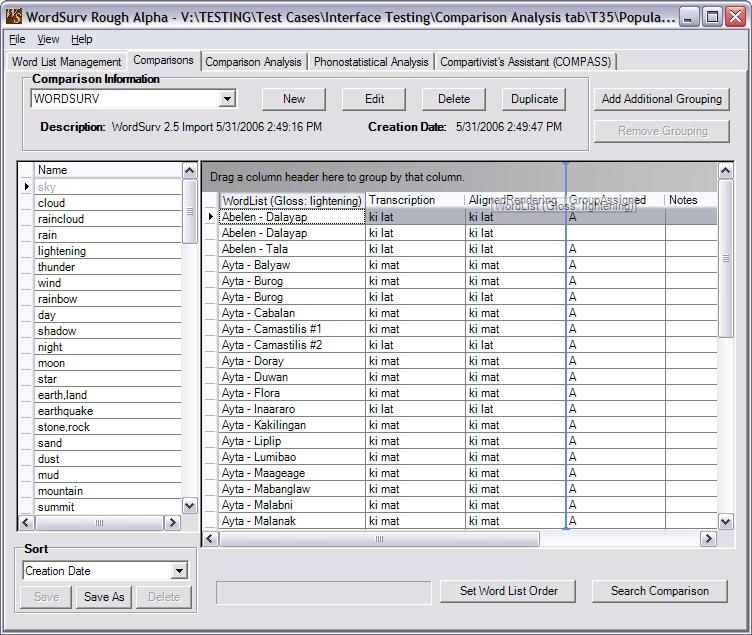
Fig. 4.b
When you click and hold on a column header and then drag the mouse to the left or right a line appears, this is to show where the column will be repositioned when you release the mouse button.
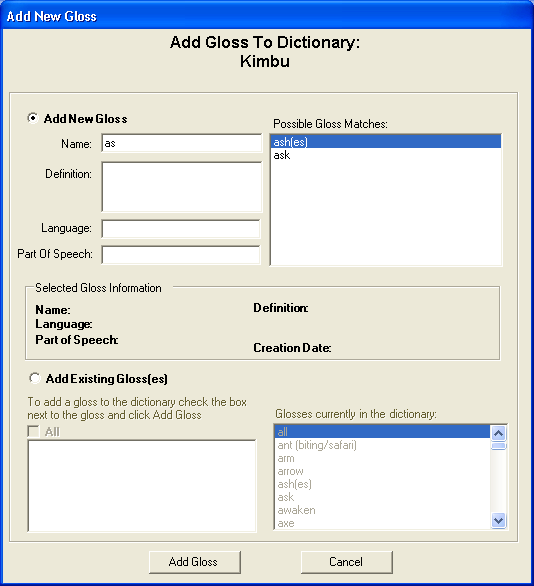
Fig. 5
When you click the Add Gloss(es) to Dictionary button you will be shown this form (Fig 5). If you wish to add a new gloss, select the radio button next to the Add New Gloss text. The name, definition, language and part of speech text boxes will be enabled along with the possible gloss matches. You will notice that existing gloss names will appear in the box to the right. This is to help determine if the gloss you are adding already exists in the database. If you select either a gloss from the possible gloss matches or the glosses currently in the dictionary, the gloss information will appear in the middle of the form in the Selected Gloss Information section. If you wish to add an existing gloss to the gloss dictionary then select the Add Existing Gloss(es) radio button. You can then select a gloss in the check list box and it will display the gloss information in the Selected Gloss Information section. To add an existing gloss, check the check box next to the gloss that you wish to add and then click the Add Gloss button. If you wish to close the form without adding a new gloss to the dictionary then you can select the Cancel button.
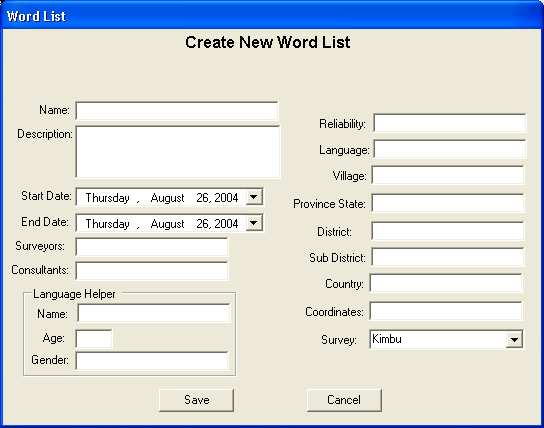
Fig. 8
When you click the button to create a new word list this form (Fig 8) will be shown. Enter the appropriate data into the different fields. The only required fields are the name and a survey to add the word list to. You can select the survey from the drop down list of surveys that are currently in the database. The start date and end date fields have calendars built into them. To access the calendars select the down arrow at the end of the date. You can then click on the month or the year to change them and select the day from the calendar.
When you edit a word list it, will automatically load the current information into the appropriate fields. If the dates are not valid or they were not imported correctly then the date will default to January 1, 1900. When you are finished making changes to the word list click the save button. If you wish to discard your changes click the cancel button.
Duplicating a word list is similar to editing one except that it will save the information under a different name that you specify. The information will automatically be loaded into the appropriate fields so you can change them as needed. You will notice two check boxes in the lower right hand of the form. If you wish to preserve the transcriptions then check the preserve transcriptions check box. If this is unchecked, the transcriptions in the new word list will be empty. If you wish to save the sort orderings for the word list, check the preserve collations check box.

Fig. 11
When you select the Add Gloss to Word List button you will be shown this form (Fig 11). Enter the appropriate information in the text boxes. When you type in a name for the gloss you will see that possible matches are then displayed in the box to the right. This is to help you determine if the gloss already exists in the database. To see information about the gloss, select it in the box to the right and the information will be displayed below in the select gloss information section. To add a new gloss to the word list, select Add Gloss. It will be added to the all glosses gloss dictionary.
![]()
Fig. 12
When you are trying to search the word list you will be given this search form (Fig 12). If you are searching a comparison, the gloss radio button will be disabled because there are not any glosses in the comparison table. Enter the text that you wish to find in the Find What field. You can match case by checking the match case check box. If you wish to search for that word specifically then you can check the find whole word only. You are only able to use the replace feature on the transcription column. Make sure the transcriptions radio button is selected and you can then click the Replace>> button to show the replace options (See Fig 13). Click Find Next to find the next instance of the search string. The close button will close the form.
![]()
Fig. 13
Enter the text you wish to replace in the find what field and the text to replace it with in the replace with field. Then click the replace button to replace the next occurrence of the search string.
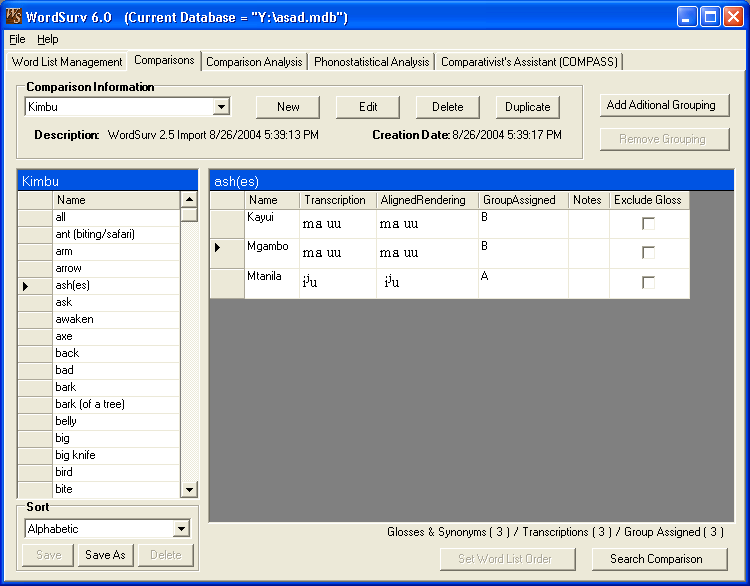
Fig. 14
Fig 14 shows the comparisons tab. The comparisons are located in the drop-down list box in the upper left hand side of the form. When you select a comparison from the list it will load the glosses in the comparison into the grid on the left hand side. When you select a gloss from the comparison gloss list it will then load all of the transcriptions for the different word lists that contain that gloss that are a part of the comparison. You can modify the aligned rendering to line up the phonemes appropriately. You can then add a grouping in the group assigned column. If the group assigned is blank or 0 then it will be excluded from the calculations. You can also exclude an entire gloss by checking the exclude gloss check box in the far right column. If you wish to add notes about the gloss you can add those in the notes column. If you wish to search the transcriptions within the comparison then select the search comparison button (See Fig 12). You may also rearrange the rows within the comparison grid and then save that order by clicking the set word list order button. You can rearrange the glosses in the comparison gloss list on the left hand side as well (Fig 4). You can then save the ordering as a name that you define or save as the current collation (unless the current collations is alphabetic or creation date). If you wish to add another grouping to a transcription, select the add additional grouping button in the upper right corner of the form. The edit, delete and duplicate buttons at the top all pertain to the selected word list. To create a new comparison, select the new button at the top of the form.
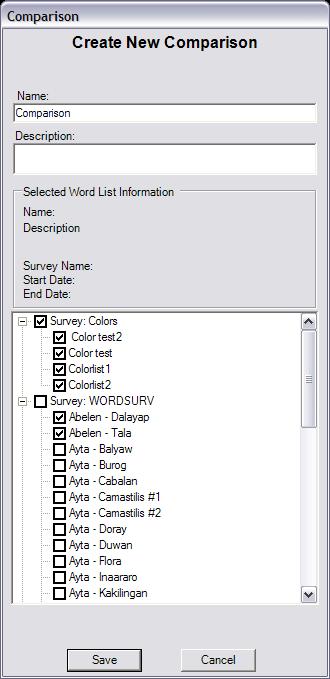
Fig. 14.B
Fig 14.B shows the new comparisons menu. The new way of creating comparisons is easy to use, and provides optimal functionality. You can check the box by a survey to include all of the wordlist contained by that survey, or you can expand the survey by clicking on the + next to the survey and then select word list individually by checking the boxes next to the ones you want in the comparison.

Fig. 15
Fig 15 shows the comparison analysis tab. This was known as the results tab in version 4.0 / 5.0. You can select a comparison from the list in the upper left hand side of the form. You can select to show either the tally count, the total count or the percentage. The tally matrix is the number of common glosses that have the same groupings. The total matrix is the total number of common glosses and the percentage matrix is the tally divided by the total and then multiplied by 100. If you wish to save the order of the matrix after you have rearranged the columns you can click the save new matrix order button. You can hide rows by holding down the mouse button on a column header and then drag it off the grid and release the mouse button. A message box will appear asking if you wish to hide the column or not. If you do then select yes. You can do the same for the rows as well. If you wish to show all the hidden columns and rows then select the show all rows and columns button.

Fig. 16
On the left hand side of the Phonostatistical Analysis (known as PhonoStats in version 5.0) tab (Fig 16) is the degrees of difference list. You can select a comparison from the comparison drop-down list box in the upper left hand side of the tab. The creation date and description for the comparison will be displayed. You can edit the degrees of difference values in this area. Once you change a value here, the analysis must be run again. You can run it again by selecting one of the three radio buttons in the upper right hand of the tab. The total degrees of difference is the sum of the degrees of difference for the same gloss with the same grouping between the two word lists. You can also rearrange the rows and columns in the main grid on this form. If you wish to save the newly arranged order then select the save new matrix order. If you wish to see all of the hidden rows and columns then click the show all rows and columns button.
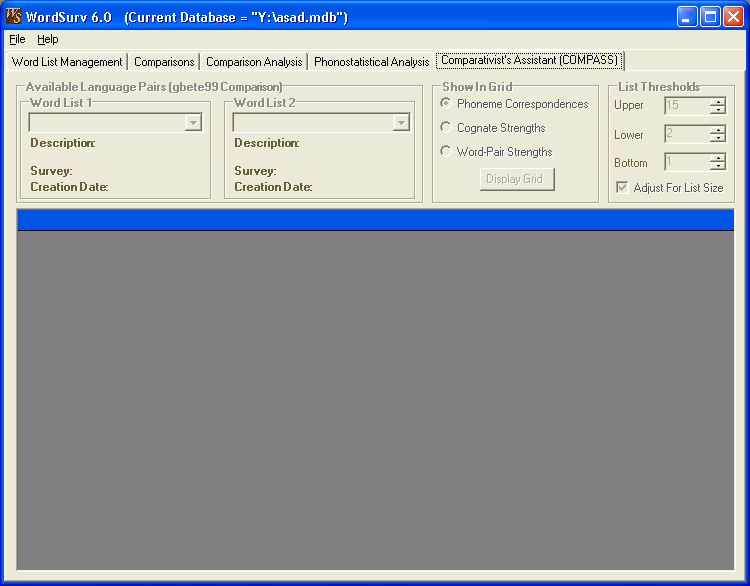
Fig. 17
This is the COMPASS feature of Wordsurv 6 (fig. 17). In the upper left hand side you can select two different word lists to compare. Then you can select to display either the Phoneme Correspondences, Cognate Strengths or Word-Pair Strengths. On the far right side you can also adjust the threshold to use for the COMPASS routine. You can check the check box below the thresholds if you wish to adjust the thresholds for the size of the comparison. The information will be displayed in the grid after the Display Grid button is selected.
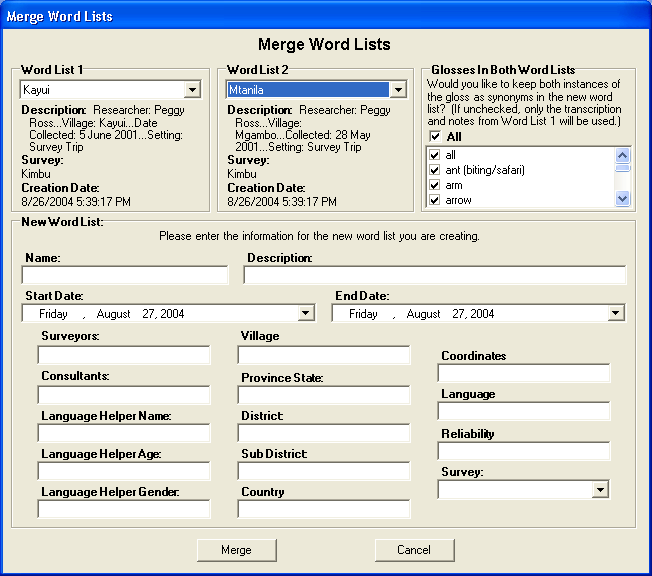
Fig. 18
The ability to merge word lists is a new feature to WordSurv. This is the merge form (Fig 18) which allows you to merge two different word lists together. You can access this form by selecting File -> Merge -> Word Lists from the program menu. After you select the two word lists to merge, you can enter in all the information for the new merged word list. In the upper right hand you will see a list of check boxes If there are glosses that exist in both word lists, they will be displayed here. Check the box next to the gloss if you wish to keep both glosses as synonyms. Otherwise it will just take the instance of the gloss from the first word list and the instance of the gloss from the second word list will be discarded.
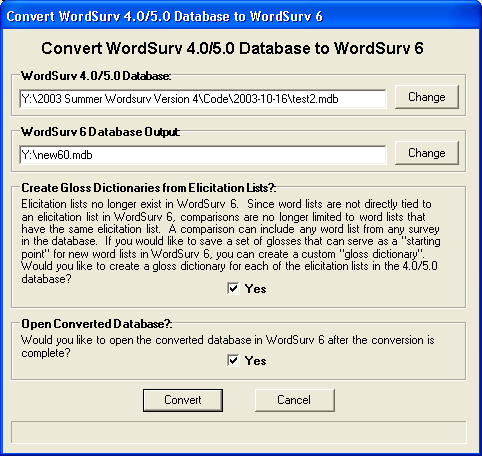
Fig. 19
When first selecting the convert option from the file menu you will be asked for a 4.0 / 5.0 database to convert from and then asked for a name to convert to. You will be then displayed this screen (Fig 19). You can change the 4.0 / 5.0 database that will be converted by clicking the change button next to the 4.0 / 5.0 field. The same applies to the version 6 database. If you would like to have custom gloss dictionaries created from elicitation lists, check the first Yes check box (to see why this has been changed in WordSurv 6, see Improvements Over Past Versions -> Limits of Elicitation Lists Removed). If you would like to open the newly converted database after conversion then check the second yes check box Click convert to convert the database. You will see a progress bar at the bottom to show the conversion progress.

Fig. 20
This is the form (Fig 20) that is displayed when you select File -> Export -> WordSurv 2.5 Database. On the is the location for the location of the 2.5 catalog and database files. You can change either of these by selecting the change button. You can give the new survey a name or it will choose one by default if this field is left blank. The same applies for the comparison. You can also add a name for the gloss dictionary if you want. If you don not want to create a new gloss dictionary with the glosses in the 2.5 database then uncheck the Yes check box. Click Continue to go to the next step (See Fig 21).

Fig. 21
The glosses in the upper right are glosses that already exits. Leave the check box checked next to the gloss if you want to use the existing gloss and not import a new one with the same name. If you select a gloss from this list it will display the WordSurv possible matches to the right. When you select a possible match on the upper right, the gloss definition will be displayed directly below it. At the bottom it detects all of the new glosses that do not already exist in the database. These glosses must be imported. If you select a gloss in this list, you can type in the gloss information into the appropriate fields. When you are finished click the import button.
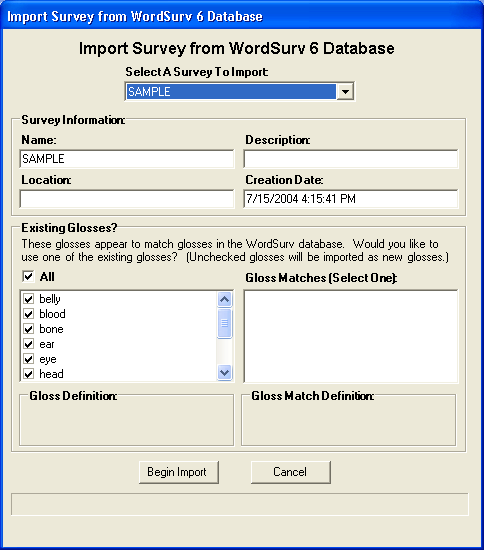
Fig. 24
WordSurv 6 has the ability to import individual surveys and gloss dictionaries from one WordSurv 6 database into another WordSurv 6 database ( Improvements Over Past Versions -> Importing from other WordSurv 6 Databases). When you want to import a survey from an existing WordSurv 6 database, this form will be displayed (Fig 24). You can select which survey you wish to import from the database. You can then enter the survey information which will be saved in the currently opened database. In the middle of the form is a check list box that displays glosses that already exist in the database you are importing into. Selecting one of these glosses will display the possible gloss matches in the database. To import the gloss as a new gloss and not use the existing match you can uncheck the check box next to the gloss. Click the begin import button to import the gloss dictionary. The progress will be shown at the bottom of the form in a progress bar. Gloss dictionaries can be imported from another WordSurv 6 database is a very similar manner.

Fig. 25
WordSurv 6 also has the ability to import individual surveys and gloss dictionaries from an XML file. Survey XML and Gloss Dictionary XML files can be generated by WordSurv 6 or the PalmSurv converter. XML files have made data transfer between WordSurv and PalmSurv much easier than before (Improvements Over Past Versions -> Smooth Integration with PalmSurv). When you import a survey from an XML file, this form will be displayed (Fig 25). You can then give the survey a name and a description in the New Survey section (although these values will be preserved in the XML file). In the New Gloss Dictionary section you can choose whether to create a new gloss dictionary from the glosses in the Survey XML file. The possible gloss matches are displayed on the form as well and you can choose whether to use an existing gloss with the same name if one already exists in the database, or to create a new gloss. This works much the same as the WordSurv 6 Database survey import (see Fig 24 description). Gloss dictionary XML files are imported in a very similar manner.
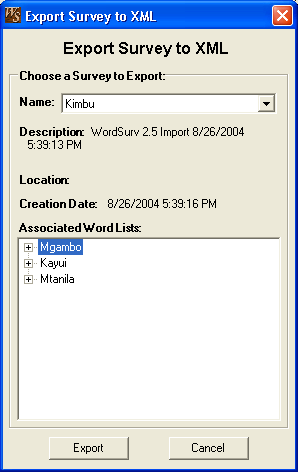
Fig. 26
When you export a survey to XML, this form will be shown (Fig 26). You can select any survey in the database from the survey drop-down list box at the top. When you select a survey it will display the survey information in the middle along with the associated word lists at the bottom. You can expand these out to see more information about the word lists. Once you are sure you have selected the correct survey, simply click the export button to create the survey XML file. Gloss dictionaries can be exported to XML in a very similar manner.
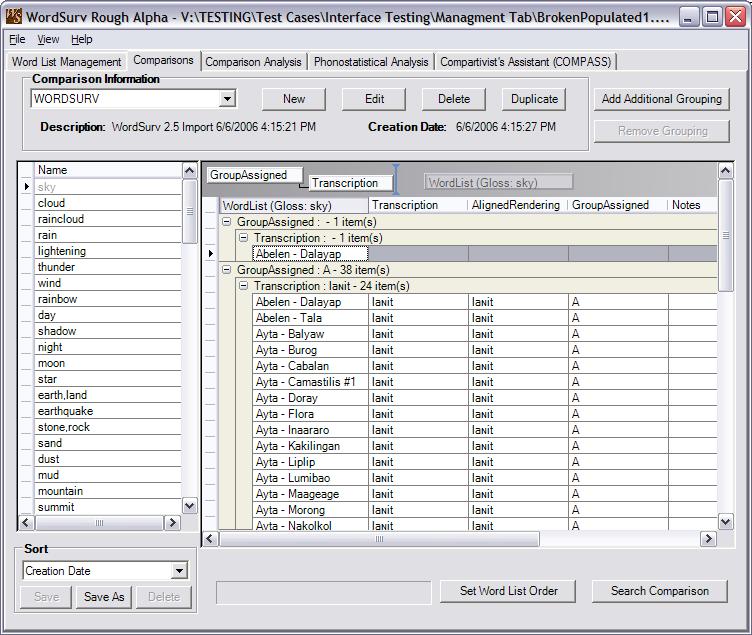
Fig. 27
When creating comparisons, you may find that you want to visually group the wordlist, and there transcriptions in a particular way. Such as by group... This is made a lot easier by the grouping functionality Wordsurv 6 has to offer. To visually group the wordlist by there group assigned, simply click and hold on a column header as if you were re-ordering it, and move it into the box noted by the text "Drag a column header here to group by that column". And to remove this grouping, simply drag the header out of the grouping box!
Fig. 28
When creating comparisons, you may find that you want to visually group the wordlist, and there transcriptions in a particular way. Such as by group... This is made a lot easier by the grouping functionality Wordsurv 6 has to offer. To visually group the wordlist by there group assigned, simply click and hold on a column header as if you were re-ordering it, and move it into the box noted by the text "Drag a column header here to group by that column". And to remove this grouping, simply drag the header out of the grouping box!
![]()
Fig. 29
Fig 29 shows what happens when you edit a transcription for a gloss. To enter this edit mode you simply double click the cell for a gloss in the transcription column. Doing this will enter you into an edit mode, that locks other features. This allows for the editing of transcriptions, while allowing you to undo changes that you may not have ment to make. When you are ready to leave edit mode you simply click the "commit changes" button, this will provide you with a menu asking if you would like to save, or reject your changes. The menu also contains a cancel option, if this option is taken, it closes the menu , and takes you back to edit mode.
This concludes the overview of WordSurv 6. This overview was updated in June of 2006 and there are plans to add even more functionality to WordSurv 6 before it is released. This overview will be updated as additional features are completed.